You have been finding cool weaving drafts all over the place, you are getting excited that you are starting to be able to understand what you are reading. You skip over to a library you know has books of weaving drafts and you try to explore some historical weaves. You open up a book and suddenly there are no pictures! All there is are grids and notes and nothing to indicate what you are looking at.
Don't be devastated! It takes a little more work, but you can create your own draw down from information that is given. A prime example would be drafts that were written by Russell E. Groff. At my college library I took out a book called 200 Patterns for Multiple Harness Looms by Russell E. Groff, and when I opened it there were pictures of the samples- but there were no clear graphs showing how to weave the pattern- just a lot of text and couple notations on the threading and the tie-up.
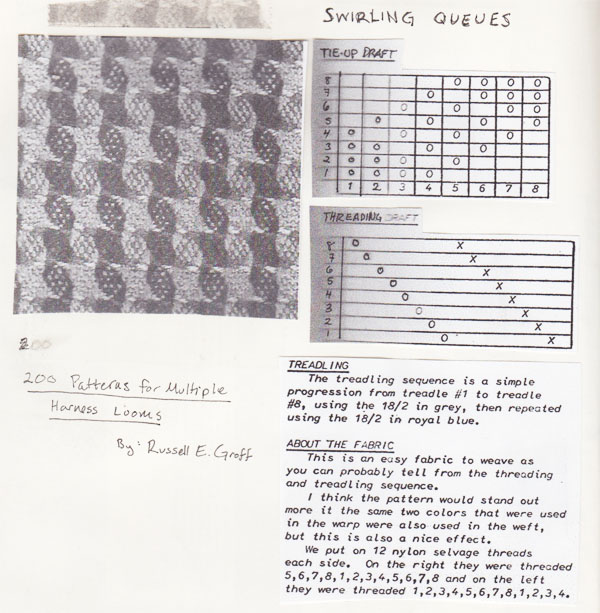
As you can see above, there isn't an immediate graph showing what to do. Although there is a sample shown with the information, it is difficult to discern what is actually happening structurally with this draft. So here is a step by step lesson in how to draw out a graph (instead of using PixeLoom, I will be using graph paper and colored pencils and markers so those who dont have access to weaving software can still follow along.)
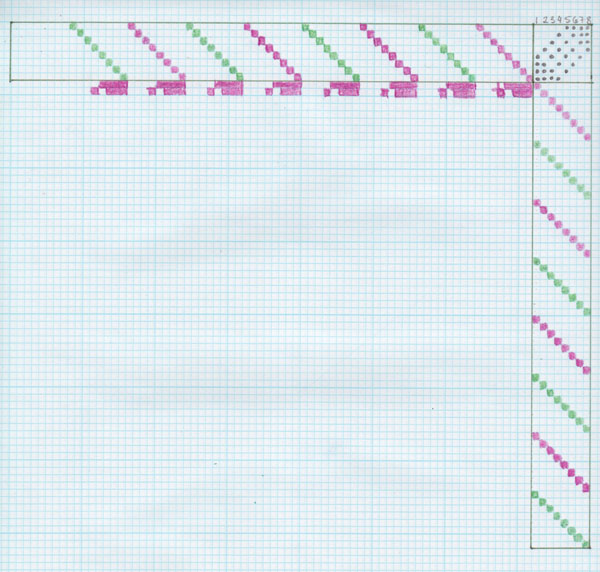
STEP ONE: The Setup
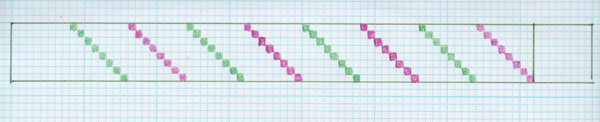
First, I would draw in the threading across the top. Since this is a color and weave pattern I have chosen two contrasting colors in order to show the differences. The threading draft from the Swirling Queues is a straight draw, each thread in each consecutive harness.
Next, fill in the tie-up in the right hand corner
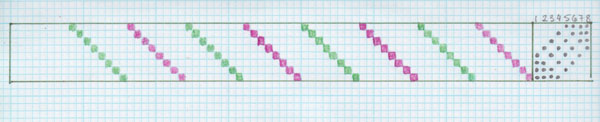
Each one of those dots represents an attatchment to the corresponding harness, and each vertical column of dots represents a treadle. I have numbered along the top the treadle numbers. This is a practice I do no matter the level of difficulty in the pattern because then I can always refer back to which treadle I am using. When I was learning to weave I used to number my treadles and I would write out the pattern using those numbers. This was how I learned how to create a rhythm in my weaving. The numbering on the draft is a byproduct of that learning experience.
Now for the treadling:
Following the tie-up chart in the Groff draft, there are numbers listed along the bottom of the chart. Those numbers indicate the treadling sequence. In other drafts, this may also be listed out (i.e. 1,3,2,4,3,5,4,6,5,7,6,8,7 ) Each of those numbers correspond to a treadle. This particular draft is tromp as writ, or straight draw: meaning the treadling the sequence is the same as the threading sequence.
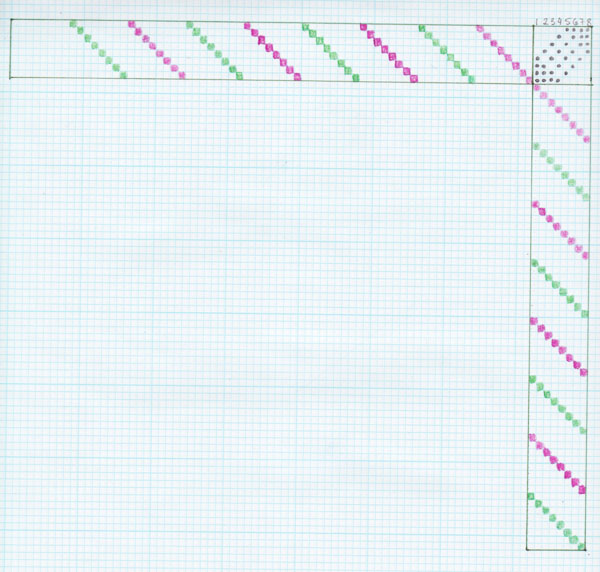
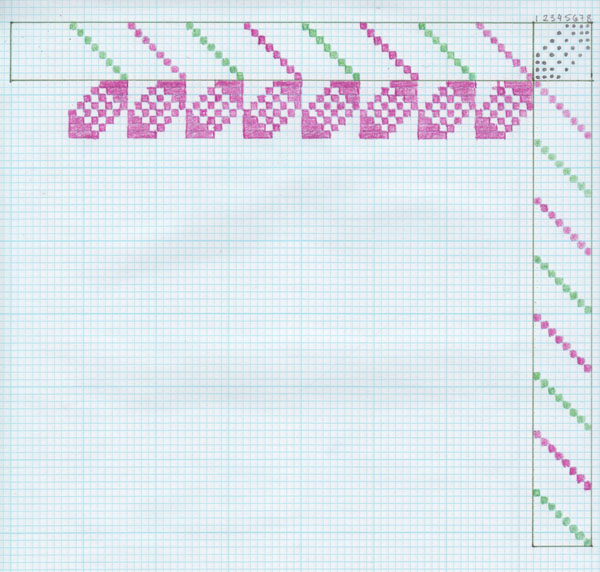
STEP TWO: Drawing in the chart.
Using the same color for the weft as indicated by my treadling sequence I go across the graph, filling in the squares that correspond to the harnesses attatched to that treadle. Although, I am using a rising shed (the threads in those harnesses are being raised up), I am drawing this pattern out with a sinking shed (the pattern threads are being lowered so the weft passes over them). I do this because it is easier for me to see the direct correlation between the harnesses, the threading and treadling.
The other way to fill in the squares would be to fill in along the graph what isn't marked in the tie up. So as you go from right to left, the squares you would fill in (in groups of 8) would be 5,6,7,8; instead of 1,2,3,4. This way you would be drawing specifically for the rising shed.
The second line down I did the same thing. I looked at the tie-up for that particular treadle, then for each harness it corresponded to, I filled in that square.
I continue in this manner until one repeat of the pattern is done. Sometimes you only need one repeat drawn out in order to see what is happening with your cloth. But, if it is a smaller pattern, I recommended continuing the process until you can visualize how the draft will work.
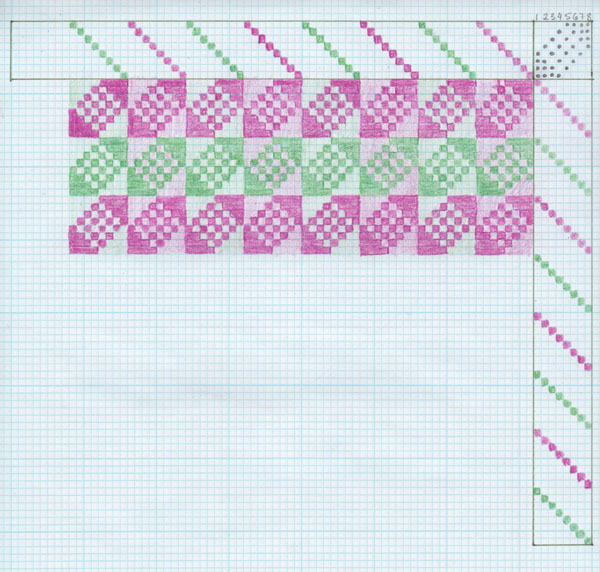
As I drew, I lightly colored in the white spaces with what was the warp thread. This way I, not only can I see the structure being developed, but I can also see the color interacting.
You can do this with almost any pattern. Double weave would be difficult to draw out by hand because when you draw the draw down, you are drawing the face side of the cloth. In double weave there are two different faces, one on top and one underneath, so it would be very difficult to discern the image when drawing it on the graph.
The long solid colors in your draft do not indicate long floats. A trick I do to think about it is two visualize (or actually wrap threads around a card) 8 threads. each one of those threads is connected to the harnesses. In the first part of the sequence you would raise threads 1,2,3, and 4. The next step you would raise threads 1,2,3, and 5. In this manner, you never see a group of threads larger than 4.
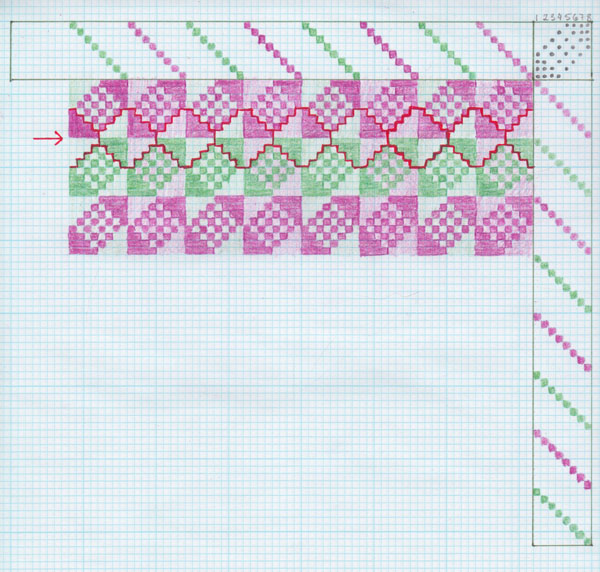
You can also see by where the colors break. Where I have outline in red are the "Swirls" in the pattern. There are dark sections and light sections. The light sections equal warp and the dark sections equal weft. The point at where the switch, is where the float ends.
And that is how I hand draw and draw down.
Do you have different ways of doing this process? Have you found a cryptic weaving draft that you just can't visualize and you need help? Post a question or comment, I would love to hear from you!