Overshot Basics

This Article is part of a series about Overshot Weaving

I contracted the weaving bug when I first started looking at overshot. There is something about the idea of making circles and curves in a format of 90 degree angles that has always been intriguing to me.

Beautiful undulating lines and bold patterns!

However, I didn't know the slightest thing about overshot patterns when I tried them. I couldn't figure out why I wasn't creating roses, or stars, or anything really- just weird floats with no pattern structure at all. The above pattern has been on my "to weave list" since I could comfortably warp a loom by myself.

Now that I have designed a little bit and have actually woven some true overshot, let me share with you what I have learned! (And hopefully get to weaving some of the drafts on my "to weave list").

Most drafts do not have the tabby drawn in to the treadling.

An overshot draft scanned from "A Handweaver's Pattern Book" by Marguerite P. Davison.

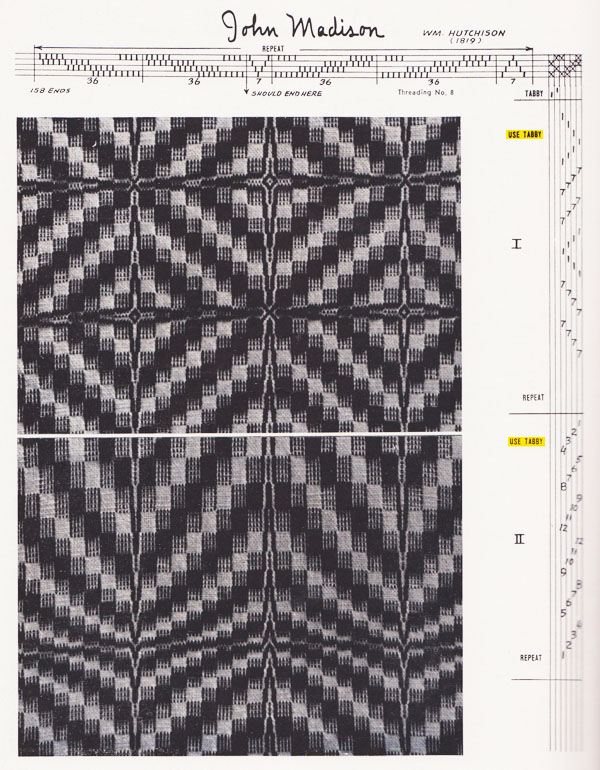
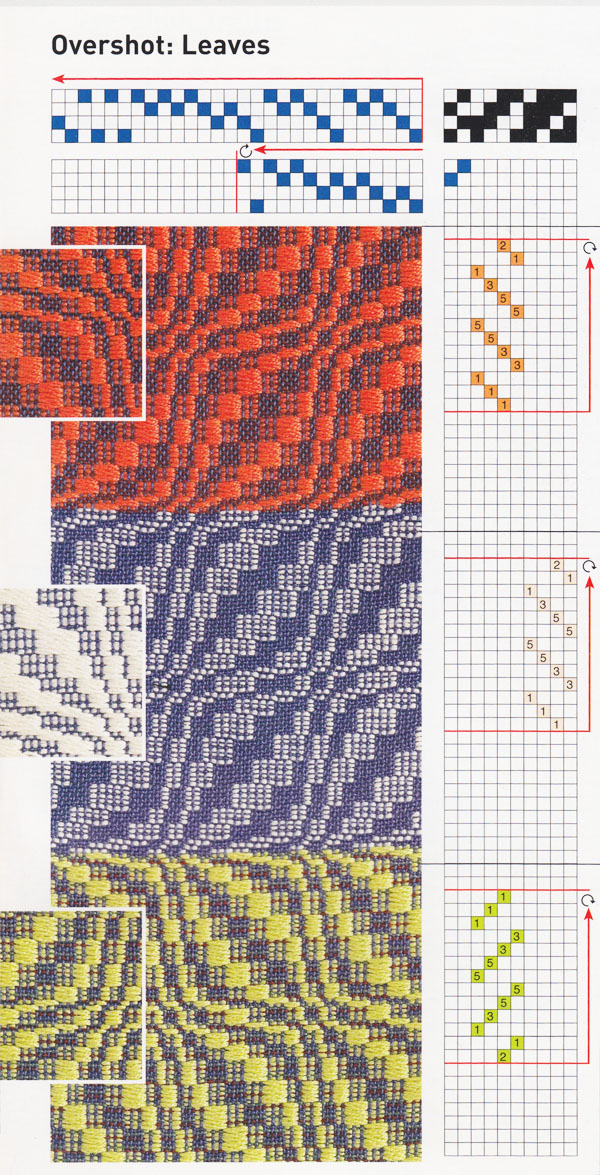
Where I have highlighted in yellow, it says USE TABBY. What that means is that after every pattern shot, you want to use the alternating tabby shot to secure your pattern weft. So when you break down the treadling pattern step by step:

  1. Tabby shot: 1,3
  2. Pattern shot: 1,4
  3. Tabby shot: 2,4
  4. Pattern shot: 1,2
  5. Tabby shot: 1,3
  6. Pattern shot: 2,3
  7. Tabby shot: 2,4
  8. Pattern shot: 3,4
  9. etc...

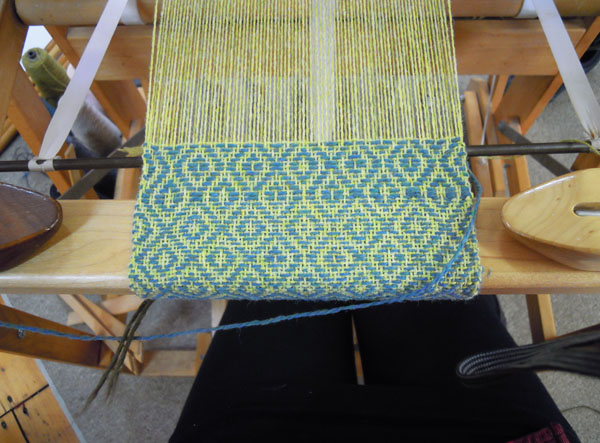
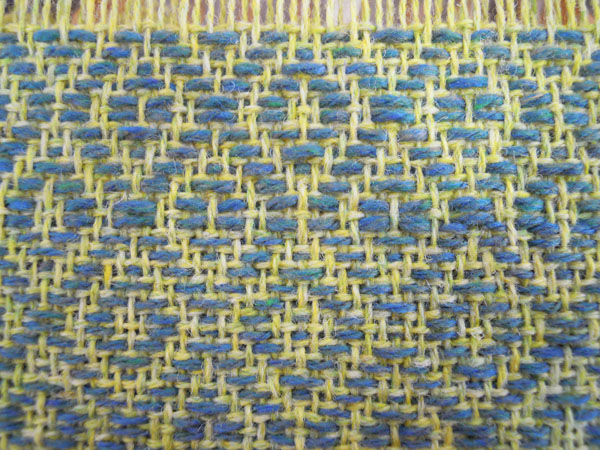
At first, when I thought I understood this, I tried to weave overshot by using the same weight yarn in the warp and weft.

This piece was woven with an overshot pattern using the same yarn in both the warp and weft.
This is the draft I wove it from.

Which leads me to my next lesson: Your pattern weft must be heavier than your tabby weft.

So potentially what I wove above would have worked if I had doubled or tripled the pattern weft and left the tabby weft the same. Instead, by using the same weight through-out, made the pattern weft just as much a part of the structure as the tabby weft. Having a heavier pattern weft, allows the yarn to be pushed above the smaller tabby weft, so it covers what is woven below it. This means that after the cloth is woven, you could basically snip away the pattern wefts and the fabric will still be solid because of the packing of the finer tabby weft.

Simple diamond overshot.
On this simple diamond overshot, I switched from using the same size pattern weft to a heavier weft. You can see the difference in the strength of the pattern.
Closeup of simple diamond overshot.
Here is a close up of that change. You can see that instead of being an integral part of the weaving, the pattern weft is just floating over top of the tabby threads.

Next post we will cover more of the technical aspects of overshot: how the pattern is developed, how it forms in the cloth, and what you can or can not do with it.

  1. Sandy Newton
    I am ready to try overshot, but am wondering how to spread my warp on a 10 dent reed for 16 epi. I am weaving Partners in Life. I warp front to back and am left handed so usually start on the left side, although my instructions are for the right. Should I follow the right side directions?
  2. Catherine
    This is a timely topic. A friend has invited me to join her for a four day course of overshot at The Mannings, making a shawl in three colors of 10/2 perle cotton done in a gamp of five Davidson patterns taught by Tom Knisely who can explain anything. I am not up to speed on overshot yet and need to learn all I can before April 8 when the class starts. Grateful for your post and looking forward to more on the subject. Your diamond pattern is lovely.
  3. heidi deleo
    may I have a suggestion? I would like to make a quilt of 9 ' X 9" squares with overshot using different patterns and colors on a four harness, four treadle loom, I am wondering if I make a long warp, if I could sample on the same warp by getting different effects for each square.
  4. Paul Matzek
    In "How to read a weaving draft" the numbers in the treadling draft correspond to the treadle to be pressed. In the overshot draft, the treadling draft has 7s and 12s, etc, though it appears the draft is for a 4 harness, 6 treadle loom. Very confusing. How can the same number appear under four different treadles?
  5. Francine
    Seven years later.. I am trying to figure out this exact draft from Davidson’s pattern book. I am confused about the « should end here » directive in the threading. From right to left, do I thread completely to left and then repeat left part to the «  end here »? I really don’t understand. Thank you!
  6. Stelios
    You just blew my mind.....this is totally new for me.....i thought i was always wrong with my weaving. Thanks for making it easier :-)))))
  7. Susan Hall
    Hi Tegan, Can you tell me the source for the "Leaves" pattern? I think I can weave it from your photo, but I'd love a little more information as I haven't woven overshot for a really long time and am feeling somewhat insecure about it! thanks so much!
  8. Susan Hall
    Thank you much!
  9. clgordon
    Hi, Teagan - Our guild recently had a Friendship overshot block exchange. I decided to participate. Now I'm looking for suggestions for techniques to connect the blocks into throws or a quilt. Woven bands on my loom? Inkle bands? Crochet the edges and link the edges?? So far, I haven't found much online. Thought I'd check to see how you've used the blocks. I'm considering pillows for my sample blocks. Thank you for your comments/suggestions! Carrie
  10. Donna
    Thank you so much for posting this! I am working on overshot for the first time also. And am using a draft FROM THE SAME BOOK! I prefer to learn only from books, blogs and videos. Though I love her book, she did leave out some finer points as you and I have noticed. Thanks to you I now have full clarification regarding how to integrate the tabby. Her directions are "Use alternating tabby after each pattern pick." These are good directions she used. But I did not understand that sentence! However, now I clearly see what to do after reading your post.